Tuesday 29 November 2011

The Farmers Breakfast At Skylark Farm

After weeks of waiting our opening day is almost here!
One more day of practising and preparing our menu and on Thursday we finally open to the public!
Today i prepared breakfasts and designed how they would be served.
This is the farmers breakfast for the big appetite.
This is the Peckly Breakfast for the smaller appetite.


Both come with tea and toast included in the price.

Delish!


Monday 14 November 2011

The Finishing Touch

Often we can spend hours preparing food for guests but it can be a garnish that can really make the end result look quite spectacular. Today i'm demonstrating two such ways of wowing your dinner guests.


How To Make An Apple Swan


Take your apple and slice off the bottom 1/4. Leave to one side for later.


Sit your apple on it's now flat base and cut two wedges from each side of the apple making sure you leave a center strip about 1 centimeter wide.


From each wedge, cut another wedge.


Repeat this process again and sit them all inside each other and slide out.


From your center strip use a pointed edged knife to cut out a small rectangle.


Using the original 1/4, that you cut off the bottom slice, off the rounded end.


This is the tricky part. From your apple circle cut out the shape of a swan's neck.


Use a small piece of the red to make an eye.


Insert your swan's "neck" into the rectangular hole you made in the center strip of the apple and place wedges back where originally cut from.


And there you go an Apple Swan.


To keep from discolouring, spray with a solution of lemon and water.


How To Make A Tomato Rose


Using a sharp knife gently slice into the base of your tomato.


Without tearing the skin continue cutting round and round the tomato to form a long strip.


Start to curl the end round.


Keep winding round until it sits in the round base.


Cut semi circles of cucumber to sit at the base to look like leaves.


I hope you enjoyed this tutorial and give it a go yourself.

I'm entering this post in the Handmade Monday blog hop organised by Wendy of 1st Unique Gifts. Pop along to see what other crafters have been up to this week.

************

Thursday 10 November 2011

Orange And Lemon Cream Crunch Dessert

Today i'm using the Orange and Lemon from my fruit bowl to make 2 delicious, quick and easy desserts.

Also needed for this recipe are:
500g Crushed Digestive Biscuits
4ozs Melted Butter
1pt Double Cream
14oz Tin Condensed Milk
Zest and Juice of 2 Lemons or Oranges
Food colouring (Optional)
Cocoa Powder (optional)
Melted or Grated, Plain Or Milk Chocolate For Decoration

First add the crushed digestives to the melted butter and mix well until all the biscuit has been coated then press into a large flan tin or equivalant. I'm distributing mine into individual pots. Refrigerate to harden.
Whip up the double cream until quite stiff, then add your condensed milk, citrus juice and zest and mix well.
Because i made both desserts i split the cream mixture, after adding the condensed milk, into 2 bowls and added the juice and zest of 1 lemon to one half and the juice and zest of 1 orange to the other.
With the orange i added 3 tbsps cocoa powder for a chocolate orange taste and to the lemon i added a few drops of yellow food colouring to give it a lovely lemon colour.
Spread your cream mixture over your biscuit base and leave in the fridge to set.
**************
When serving you can make it look just that little bit more fancy by either grating chocolate over the top or melting some chocolate, coating a spoon with it and performing a "flicking" action over your dessert.
And here they are!

Sunday 6 November 2011

Whoopie Pies

Today i am writing this post as an entry for a brilliant Monday Blog Hop for crafters called HANDMADE MONDAY which is organised weekly by Wendy of 1stunique gifts. This hop is now in week 41 and is a good way of directing traffic to your blog and also to see what other crafters get up to each week.
This is my first entry as Chef At Skylark but some of you visiting may know me from my other sewing blog Dreamstar Diary which, unfortunately, i am needing to take a short break from at present whilst preparing for my new job in the farm cafe. More details about my job can be found at http://chefatskylarkfarmhousecafe.blogspot.com/2011/10/welcome-to-skylark-farm.html

So for now let's talk about WHOOPIE PIES
When Sam (my boss) asked me to make Whoopie Pies my reply was "what on earth are whoopie pies?" She replied that they were the new craze. Two round cake-like biscuits sandwiched together by a creamy marshmallow filling.
So home to the computer i went to do some research. First i searched recipes and found this one
http://www.recipes4us.co.uk/Cakes%20and%20Baked%20Fayre/Whoopie%20Pies.htm
My first attempt came out lovely but i hadnt made the filling stiff enough so as you bit into them the marshmallow oozed out the sides with nothing left once you reached the center.


1st Attempt At Whoopie Pies

So next attempt i whisked the filling for longer and then scoured Flickr photo sharing site to see how other peoples attempts turned out! It's a great site for inspiration it really is.
I made them smaller this time and split the mixture into 3 and coloured it red and yellow and in the yellow ones i added some fresh lemon juice.
And here they are drizzled with melted chocolate and dusted with icing sugar.

whoopie pies

And just as finished all my research i saw an advert for a new Betty Crocker packet mix for Whoopie Pies!
Thanks for popping by and maybe i will see you at Handmade Monday again x

Saturday 5 November 2011

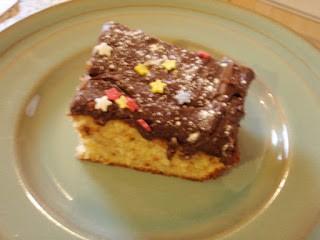
Frosted Banana Bars

Still using up the damaged goods from the farm shop these bananas look rather brown and cannot remain on the shelves for sale so they got given to me.

Such a shame when beneath the outer layer is still a lovely white, firm banana.


So i looked for a recipe to use the bananas in and came across a lovely one in this "cakes and bakes" book by Hamlyn called Frosted Banana Bars.


For the Base

60z Butter (room temperature)

6oz Caster Sugar

3 Eggs (beaten)

8oz Self-Raising Flour

1 Tsp Baking Powder

2 Bananas (10oz) roughly mashed

For The Frosting

2oz Butter
1oz Cocoa Powder

8oz Icing Sugar

1-2 Tbsp Milk

Star Shaped Sprinkles


Method

Cream the butter and sugar together. Gradually and alternatively mix in spoonfuls of beaten egg and flour until the mixture is smooth. Add the baking powder and mashed banana and mix well.

Spoon the mixture into a 7 x 11ins roasting tin lined with nonstick baking paper and smooth out the surface level. Bake at 180C/350F/gas mark 4 for 25-30 ins til well risen, golden and springs back when gently pressed with a fingertip. Leave to cool in the tin.

For the frosting, heat the butter in a small saucepan then stir in the cocoa powder. Remove from the heat and mix in the icing sugar. Return to the heat, stir til melted and add enough milk to mix to a smooth spreadable icing.

Pour the icing over the top of the cake and spread the surface level. Sprinkle the star shapes over and leave to cool and harden.

The recipe says cut into 16 but i cut into 8 so people got a lovely big slice!


Tasted lovely i can assure you so give it a go!


Wednesday 2 November 2011

Ready Steady Cook!

Like any other commercial outlet selling fresh produce Skylark Farm has it's fair share of waste each week.
Having the cafe now it is essential that we make good use of fruit and veg that are no longer nice enough to sell but still of a decent quality to be used in cooking.
So Sam set me a challenge today. I was given these 2 boxes of fruit and veg that had been removed from the shelf and told to create something with them and other store cupboard ingredients.
So in true ready steady cook style i got to work sussing out exactly what i had in my box. I seperated the veg from the fruit first and decided the veg would be my first challenge.
There were quite a lot of tomatoes and a real mixed variety of other veg so my decision was to make 2 soups.
For the tomato soup i roasted all the tomatoes in the oven first so that i could remove all their skins.
Then in a pan i sweated off some chopped onion, celery and carrot for about 5 mins before adding a couple of tbsps of tomato puree, 2 tbsp ganulated sugar, 1tbsp balsamic vinegar, salt and pepper.
Next i chopped the tomatoes and added them to the pot along with vegetable stock, enough to cover.
This all simmered away for about half hour before i removed from the heat, did a whizz in the blender then passed through a sieve. I put the soup back in the pan and seasoned slightly more to my own personal taste.


For the vegetable soup i used the same method though did not add balsamic vinegar or sugar.
And here is the end result. Thick, hearty soup which tastes delish!


After having used all the veg Sam gave me i still had onions, 1 red pepper, mushrooms and broccoli left to use.

Still with only the addition of store cupboard ingredients i decided to make quiche.


First i made the pastry base using shortcrust pastry. Very easy pastry to make so long as you remember it's half butter to plain flour with the addition of water.

I used 12 ozs of flour to 6ozs of butter for this recipe. Rub the butter in the flour (or whizz up in your food processor for quickness) and the add water to make a soft pliable dough.

Roll out and line your dish or tin with the pastry, (i treated myself yesterday to 4 small, fluted, deep, loose bottomed flan tins so i could make individual portions of quiche). You now need to bake this pastry blind.
Whilst that was baking i finely chopped up my veg and put in a bowl with some mixed herbs, salt and pepper. I whisked up 6 eggs (6yolks but only 4 whites), then added a pint of milk and whisked again.

When the pastry cases were ready i removed from the oven and put a layer of grated cheese in the bottom (bout 1/3 full), then the chopped veg on top followed by the egg/milk mixture.

Cook at 180 c/ 350 f / gas mark 4 (or if like me you have a fan oven that burns everything quickly turn your temperature down 10 degrees!) for about 35 - 45 mins.
Test to see if the inside is cooked by sticking a knife in the center of each pie and it should come out clean!
Best served warm but equally as nice cold!


So i did it and accomplished the challenge with some beautiful end results!

Pop by the blog tomorrow and i will show you what i've made from the waste fruit!


Tuesday 1 November 2011

Welcome to Skylark Farm

Welcome to "Chef At Skylark Farmhouse Cafe", a blog to document my new journey as Head Chef at a new farmhouse cafe, opening (fingers crossed) early December.

Skylark Farm, situated in the Northamptonshire countryside, is primarily a chicken farm.


8000 chickens apparently!!!!!


That's an awful lot of free range eggs produced each day!

These eggs are sold through many small shops and supermarkets in the area, including Sainsburys.


Sam and Dave run the farm and 3 years ago built a farm shop to house and promote local businesses produce.


Inside the shop you will find a large selection of fresh veg, meat,bread and cakes as well as preserves, honey, cheese and of course eggs!


Last week they had their own homegrown pumpkins for sale as well!


Now that the shop is well established the couples next venture has been to build a new cafe to the rear of the shop serving good homecooked food.


And this is where MY journey begins!


After answering an advertisement in the local paper i took up the position of Head Cook on October 17th.


So far my role has been organising and cleaning equipment, devising menus, and all the behind the scenes jobs involved in starting up a business, as well as hours of research into baking, as that is an area i havent covered before.


I have learnt so much in such a short space of time and know that there is plenty more to learn which gave me the inspiration to create this blog in the hope that you will follow me on my journey, and just maybe i may even inspire the cook inside you to attempt my recipes!


If you want further information on Skylark Fields Farm you can find a warm welcome at their website HERE